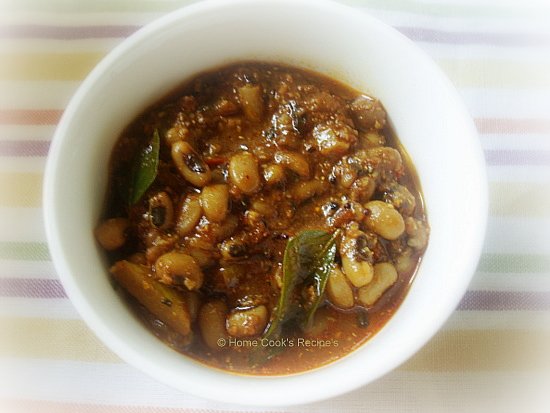
Loading

Happy New Year!


Our daughter Nora, born in January 2009, couple of weeks ago.

I wish all my readers a very happy new year. Hope that 2010 will be filled with exciting culinary discoveries, comforting old favourites and lots of delicious everyday meals.

Thank you so much for being here!


PS Those of you who are wondering about Nora's "woolly fleece" - it's from Hiiu Vill (see here).
Follow RecipesDream

Edamame Fried Rice


This is a mixture of a couple recipes. One from the food network and another from Rachael Ray.

Ingredients:
2 cups instant brown rice
2 T. canola oil
1/2 t. minced garlic
1 medium onion or a bunch of green onions
4 oz sliced water chestnuts (optional)
1 cup frozen edamame (defrosted)
1 cup cooked chicken (optional)
2 eggs, scrambled
3 T. soy sauce

Instructions:
Cook rice according to package directions. Meanwhile heat canola oil in a large saute pan over medium heat. Add onion and cook until soft, about 5 minutes. Add garlic and saute a little longer. Reduce heat to low. When rice is cooked, add to pan along with water chestnuts and edamame. Make 3 inch well in center of rice mixture. Add eggs and cook until nearly scrambled. Stir eggs into the rice mixture. Add soy sauce and blend. Serve hot.

Next time I make this I might use chicken stock to make rice and I might marinate some chicken in rice vinegar, garlic and soy sauce and then cook it and add to the fried rice. But this is a good basic fried rice recipe.
Follow RecipesDream

Texas Cadillac Salsa


I got this recipe from June. It's a winner every time! Beware...it makes a HUGE batch!
Ingredients:
1 red pepper (core and clean and dice real thin)
1 green pepper (core and clean and dice real thin)
1 orange pepper (core and clean and dice real thin)
1 red onion, diced
bunch of cilantro
1 can white corn
1 can black beans (drain and rinse)
1 can red kidney beans (drain and rinse)
Mix all veggies and beans in a bowl.

Mix the following items and bring to slight boil:
1/2 cup cider vineger
1/2 cup sugar
1/4 cup canola oil

Pour over veggie and bean mixture.
Put in fridge for 6-24 hours.
Serve with Tostito Lime Chips.
Follow RecipesDream

Peppermint Snowballs

We made these for Santa this year. I think if I were to make them again I would try to put more filling in each cookie. That was the fun chewy part.
(from Penzey Spice Magazine)

Ingredients:
2 sticks butter (1 cup), softened
1/2 cup powdered sugar
1 teaspoon vanilla extract
2 1/2 cups all purpose flour

Filling Ingredients:
2 Tablespoons cream cheese, softened
1/2 cup powdered sugar
1 teaspoon milk
2 Tablespoon crushed pepperming candy
1 drop red food coloring (optional)

Topping Ingredients:
1/2 cup crushed peppermint candy
1/2 cup powdered sugar

Instructions:
Cream together the butter and the powdered sugar. Add vanilla and mix well. Gradually add the flour and mix well. Knead the dough and then cover and refrigerate for 1 hour.

While the dough is chilling, prepare the filling by beating together the cream cheese, powdered sugar, milk, crushed candy and food coloring until well blended.

Preheat oven to 350 degrees F. Roll the dough into balls about teaspoon size. Make an indentation in the center of each ball and fill with 1/4 teaspoon of filling. Cover the indentation with another 1/4 teaspoon of dough. Smooth and reshape the dough balls. Combine the topping ingredients in a bowl. Roll the balls of dough in topping and place on ungreased cookie sheets. Bake until firm, about 12 minutes. (It took my about 20 minutes, but I think my rolled balls were bigger.) After removing from oven, roll the warm cookies in the topping once again.

Makes 3-4 dozen.
Follow RecipesDream

Easy Doughnuts


(from Real Simple, May 2007)

Ryan made these the other day and they were good. We think he overcooked them a bit, but I would definately try them again.

Ingredients:
3/4 cup vegetable oil
1 8 count package large refrigerated biscuits (such as Pillsbury Grands-Homestyle)
1/2 cup sugar
1/4 teaspooon ground cinnamon

Instructions:
Heat 1/2 cup oil in a medium skillet over medium-low heat. Place biscuits on a cutting board and cut out center with something (like a shot glass or round cookie cutter), reserving the extra dough for "holes". Test the heat of the oil by dipping the edge of a doughnut in the pan. When the oil is hot enough the edge with bubble. Place 4 of the doughnuts and the holes in the skillet and cook until golden brown, 1 to 1 1/2 minute per side. Transfer to a wire rack or a paper towel lined plate to drain. Add the remaining oil to the skillet, reheat, and cook the remaining doughnuts and holes. In a large bowl combine the sugar and the cinnamon. Gently toss the warm doughnuts into the mixture a few at a time. Serve warm or at room temperature.
Follow RecipesDream

BBQ Turkey Burgers

(from Cooking Light, March 2001)

Ingredients:
1/4 cup chopped onion
1/4 cup BBQ sauce, divided
2 Tablespoons dry breadcrumbs
2 teaspoons prepared mustard
3/4 teaspoon chili powder
1/2 teaspoon garlic powder
1/3 teaspoon salt
1 pound turkey
cooking spray
4 large leaf lettuce leaves (optional)
4 slices tomato (optional)
4 hamburger buns

Instructions:
1. Combine onion, 2 T. BBQ sauce, breadcrumbs, and the next 5 ingredients in a medium bowl. Divide turkey into 4 equal portions, shaping each into a 1 1/2 inch-thick patty.
2. Heat a grill pan coated with cooking spray over medium high heat. Place patties in pan and cool 7 minutes on each side or until done.
3. Place one lettuce leaf, 1 tomato slice and 1 patty on the bottom half of each bun. Spread each patty with 1 1/2 teaspoons BBQ sauce. Cover with buns.
Follow RecipesDream

Quickie Quiche

(from Parenting Magazine, September 2008)
I LOVE this and it's SO easy!

Ingredients:
1 (9 inch) refrigerated pie crust
5 slices bacon
1/2 small onion, peeled and chopped
1 cup shredded cheese of your choice
3 eggs
3/4 cup low-fat milk
1/2 teaspoon salt or to taste
pinch of black pepper
1/4 teaspoon nutmeg, optional

Instructions:
1. Preheat oven to 425 degrees F. Press crust into a 9 inch pie dish, and bake for 5 minutes. Remove and reduce hear to 375 degrees F.
2. In a small skillet, cook bacon until crisp. Remove from skillet and set aside on paper towels to drain. Discard all but 1 T. of drippings. Saute onions in drippings for about 2 minutes; remove pan from heat. Crumble the cooled bacon and set aside.
3. Sprinkle half of the cheese over the bottom of the pie shell. Evenly distrubute bacon and onion over the cheese.
4. In a small bowl, beat eggs, milk, salt, pepper and nutmeg, if desired. Pour mixture over bacon and onion. Sprinkle with remaining cheese and bake for 30-35 minutes, until golden brown.
Follow RecipesDream

Blender Salsa

(from Kendee R.)

I usually make a double match.

Ingredients:
14-15 oz can crushed tomatoes
1/2 teaspoon cumin
1/4 cup chopped onion
3/4 teaspoon crushed red pepper
3/4 teaspoon salt
1/4 teaspoon pepper
2 teaspoon fresh garlic, chopped
bunch of cilantro

Mix and Serve
Follow RecipesDream

Happy New Year Black-Eyed Pea Soup

Happy New Year!

I'm excited about 2010 and all the fun and anticipation a New Year brings. It doesn't look like I'll be holding a baby on my lap while watching the ball drop, however. This new little one is not following the path my other two took of arriving at exactly 38 weeks, but instead is teasing with lots of contractions and then nothing for a few hours.

2010 may be the year I develop a great deal of patience.

or completely lose my marbles.

the jury's still deliberating.

I'm not bringing a slow cooker dish (shocking, I know!) to our friend's house tonight for New Years At 9 because I wasn't sure if we'd have a newborn or be in the hospital. Instead, the kids and I are going to make a fabulous apple pie thanks to the totally awesome gluten free pie shells from Whole Foods.

and tomorrow? Tomorrow we'll eat Black Eyed Pea soup. This is the recipe I used last year, and I'm looking forward to making it again. I'm going to re-print it the way it appeared a year ago.

Have an absolutely wonderful 2010 full of lots of love and hugs.

~~~~~~~~~~~~~~~~~~~~~~~~~~~~~~~~~~~~~~~~~~~~~~~~~

CrockPot Black Eyed Pea Soup


Day 366.
because it's Leap Year.

Happy New Year's Eve! I made the most rockingest black eyed pea soup yesterday, and I take back everything I said last year about black eyed peas. They aren't gross. I just didn't know what I was doing.
And thank you also for all of the emails explaining pig anatomy. I get it now.


Although this is the end of my year-long challenge, the blog will not die, and I will not go hide in a corner in the fetal position. I promise.

Eating black eyed peas on New Years Day is good luck and is said to bring prosperity which can't be a bad thing. Ring in 2009 on the right note. Make this soup.

The Ingredients.

--1 pound dried black eyed peas
--1 pound spicy sausage (I used Aidells chicken habanero and green chile)
--6 cups chicken broth
--1 yellow onion, diced

--1 cup diced carrots
--1 cup diced celery
--4 cloves garlic, diced

--1/2 tsp Italian seasoning (not pictured. I didn't know I needed it at first. But I did.)
--1 tsp kosher salt
--1/2 tsp black pepper
--
Tabasco sauce (to add at the end to taste)

The Directions.

Soak your beans overnight. Drain and pick out the undesirables (broken, discolored beans) in the morning.


Use a 5 to 6 quart crockpot. This will serve about 8 people. Dice the veggies, and dump them into your crockpot with the pre-soaked beans. Add sliced sausage. Pour in broth, and stir in Italian seasoning, salt, and pepper.

Cover and cook on low for 8 hours, or on high for about 6.
Before serving, use a stick blender to smash up about 1 cup of beans. If you don't have a stick blender, scoop out 1 cup of beans, blend them in a traditional blender, and add back to the soup. Don't blend too much---just enough to get the broth thicker and creamy-looking.

Ladle into bowls, and add
Tabasco sauce to taste.

The Verdict.


This tastes amazing. I am so glad that I tried cooking black eyed peas again---they are earthier than other beans and make a fantastic soup base. I've got a few different
tupperwares ready to go for lunches for the next few days. My brother and sister-in-law liked it too. The kids didn't taste it---they had spaghetti for dinner.
Follow RecipesDream

Memories the Essence of Life ~ Best of 2009!

Memories are like shades that we walk under,
from the scorching sun or pouring rain,
you always have something over your head
to keep you going....

The best part of 2009 on personal has been that, I have started recording my thoughts and emotions that hit me at the most unexpected moment! I really wish at those times that I had recorder that can record the thoughts that flow..but then again..

When 2009 started I was full of hopes that this year would see the light of my cookbook. Somehow it was to happen in 2010. I was happy that I was atleast able to release a smaller version in eBook format that gave me hopes of a good on in happening.

Though the year has been the fastest one ever to be remembered, it brought along many moments to cherish and celebrate. My parents came back to India, we celebrated our 10th anniversary, I got a nephew and my boys got their admission in a school near by. So many highlights on the personal front.

In blogging front, I was able to write about Diabetes with Dad's help. celebrated the first year of Spice your Life. I am hoping that blog will get more patronage as this one. I am sure it will take off in the new year. I have many plans for it still. But of course the best part was starting Indian Cooking Challenge, which has over 100 members and all of us learn cooking traditional Indian dishes!

I started the year with My Legume Love affair and ending it with the same event.

Then I talked about Menu planning and I had a planner up which many readers asked for and said it was useful for them.

The year was active with quite a few events being held. After My Legume Love affair, it was Meeta's MM, then my own Melas of Mango and Sweets!

With Sia saying she wanted contribution for a blog that would talk beyond everything on Indian Cuisine, we came about a group Blog called Beyond Curries.

Then I had one of a kind experience by cooking for over 100 ppl along with my colleagues for my office anniversary celebration. It was beyond words to explain we shared.

When once it was a easy task, now turned into an impossible situation. That is cooking, clicking and posting on the same day. But I managed somehow with the Navratri Celebrations.

Though I would have wanted to do more posts, I found myself cooking our regular and repeated stuff on daily basis. So my plans include making new ones coming year.

On a personal level, I have more projects thought out for myself. I will be talking about them of course!

When I sit back to think on what and how I have progressed in thought process, the most significant one would be that I started thinking more positively about everything. Memories seem to be the most prominent of all. Like a sponge sucking everything, my mind seem to gasp whatever that comes up. I know it's the right way. Will write about it more in detail.

With this and the thoughts that my project takes wings soon, I take leave. I sincerely thank all my readers who have supported my dreams and make this space very dear to me. I hope I can continue receiving it in coming years too.

Traditions are what makes this life more meaningful. I hope with this a new one is formed.

I wish all my readers and friends a very happy New Year


Follow RecipesDream

Kaaraamani Kuzhambu / Lobia Curry

Recipe Marathon - Lap 7 (Final Lap)

It was just 7 days, and it flew away very fast. I enrolled myself for Nupur's Marathon, as i had many post pending on my draft and also hubby had his Project Delivery Time & was working till mid-night, So i needed some blogging time, to keep me occupied. Iam Glad I enrolled, as i got many new friends from the marathon and got to learn how to allocate time for blogging for the day.
Now I wonder, how 7 days flew so fast....

Coming to Today's Recipe Lobia / Cow Gram Curry / Kaaraamani Kuzhambu.

I don't know why, my hubby fasts on the year end. He fasts till evening and for night, he eats just fruits. so i knew, that iam alone going to eat this curry and thought why not experiment with different flavour's. I added what all caught my eye on my pantry.

Lobia / Cow Gram Curry / Kaaraamani Kuzhambu

You Can't guess, what mystery ingredients i added, just from the look or taste. But all togeather gave a nice taste, that you all should try, thats why iam posting it here.


Ingredients:

Cow Gram / Lobia / Kaaraamani - 1 cup (Soaked in water for overnight)
Tomato - 1 (finely chopped)
Garlic - 3 cloves (chopped)

Grated Coconut - 2 tbsp's
Anardana seed's / Dry Pomegranate Seeds - 2tbsp's

Kasuri Methi - 2 tbsp's
Turmeric Powder - a pinch
Kuzhambu milagaai thool / Chilli Powder - 2 tsp

Oil - 2tbsp
Mustard - 1-/4 tsp
Fenugreek - 1/4 tsp
Asafoetida powder - 1/4 tsp
Curry Leaves - 8

Method:

Heat Oil in a Kadaai or Pan. Add mustard and wait till it splutters. add fenugreek seeds, asafoetida powder and curry leaves and saute them.

Pressure Cook the Cow Gram / Kaaraamani / Lobia with 1/4 cup water and little salt upto 4 whistle's.

Grind the Grated Coconut and Anardana seeds into a coarse powder and keep aside.

Now Add the Tomato and Garlic. fry them till the tomatoes get mashed.

Now add turmeric powder, Chilli Powder, salt to taste and mix well.

Add the grounded coconut + anardana seed powder to the pan and mix well with the tomatoes.

Add the cooked lobia / kaaraamani to the pan and mix well.

Add 1/2 cup water and kasuri methi, Curry Leaves and salt to taste to the pan and mix well. let the curry boil for 5 minutes in medium flame.

This Curry tasted so Good, the anardana and kasuri methi gave nice taste to the curry.

It tasted excellent with Hot Idli's.

* You can also add tamarind paste to the curry, if you like the tangyness.

Wish You All and Your Family A Very Happy New Year....

New Year Wishes


Follow RecipesDream

Red posole for New Year's Day

red posole

I’m a black-eyed pea girl when it comes to New Year’s Day fare. A big bowl of the golden legumes, made rich with ham hocks and piquant with a dose of pepper vinegar is usually my insurance that I’m off to a good start. And throw in some smoky collards and a thick slice of ham and my good fortune is tripled! But not everyone subscribes to this view. Take my New Mexican friend Monica—she’ll be eating red posole on New Year’s Day.

Remember where we were 10 years ago? Yes, we were all waving our hands and fretting over that Y2K nonsense which predicted a computer glitch would bring the world to a standstill come midnight, January 1, 2000. Living in New York City, nothing terrified me more than being stuck in a city caught in a meltdown, so I made a plan to be in Texas for New Year’s Eve 1999 instead.

“Come on down!” said Monica, who lived in Dallas. “We’re having a big bash and you’ll be safe here. Plus, I’m making red posole.”

guajillo chile

I’d never had red posole and was a little dubious that she was serving this instead of black-eyed peas. She assured me, however, that this is what her family ate in New Mexico, not to mention it was traditional New Year’s Day fare in Mexico as well.

As she began to make the posole, she pulled out a large bag stuffed with the elegant red New Mexican chiles. They were dry but pliable and if you sniffed you could smell their fire and spice. I had never cooked with whole dried chiles before, so I was an eager student, curious to see how it was done.

She then threw into the pot the hominy or posole (as it’s known in Spanish), which gives the dish its name. These huge corn kernels have been soaked in lye water until the hull and germ have been removed, an ancient process called nixtamalization. And what’s left behind is a flavorful thick puff with enough chew and squeak to keep things interesting.

Besides our dancing like fools to Beck and Prince that New Year’s Eve, I remember how Monica’s house was fragrant with pork, chiles, garlic and corn as the posole simmered on the stove. And when the clock struck midnight and we discovered that the world was still intact, we tucked into a bowl of the rich red soup thick with hominy and looked ahead to not only a new year, but also a new decade and a new century as well.

red posole

I think we can all agree that this past decade has been challenging. But there have been many highlights for me as well, the biggest of which was starting this blog and getting to know so many of you as we've connected over our mutual love of good Texan food. And while I usually prefer black-eyed peas on New Year’s Day, I can’t help but wonder if Monica’s red posole didn’t help steer me onto this path. If so, I am eternally grateful.

So I raise my bowl to y’all for being such a bright spot in the past decade--may y’all have a peaceful, prosperous, healthy and happy New Year!

Red posole
1 pound of dried posole or two 29 oz. cans of hominy, drained
1 pound of pork shoulder, cubed
1 medium onion, diced
8 cloves of garlic, minced
2 tablespoons of lard, bacon grease, corn or canola oil
8 cups of water (can substitute part with beer or chicken broth for more flavor)
1 smoked ham hock
1 tablespoon Mexican oregano (can substitute regular oregano)
1 tablespoon cumin
1/2 teaspoon ground cloves
2 tablespoons ancho chile powder
9 New Mexico chiles, stems and seeds removed
Salt and pepper to taste
1/4 cup chopped cilantro
Juice of one lime

For serving:
One avocado sliced,
One lime cut into wedges
1 cup of cilantro, chopped
1/2 cup of diced onion
Tortillas and tortilla chips

Method:
If using dried hominy, soak the hominy a gallon of water for at least eight hours until it’s doubled in size.

In a large pot, heat up the lard and cook the onion for 10 minutes. Add the pork and brown on each side for a couple of minutes. Throw in the garlic and cook for one more minute.

Pour the water into the pot and add the ham hock, oregano, cumin, ground cloves and ancho-chile powder. Bring to a boil and then turn down to a low simmer.

Meanwhile, take your New Mexican chiles and cook on high in a dry cast-iron skillet until the pop, a couple of minutes. Turn off the heat, add water to the skillet and let the chiles soak until hydrated, about half an hour.

Drain the chile-soaking liquid, and place the chiles in a blender. Add one cup of water and blend on high until a smooth puree has formed. Stir the chile puree into the soup pot.

After a couple of hours, add the hominy to the pot along with the juice of one lime and the chopped cilantro. At this point, adjust your spices and add salt to the pot. Continue to cook on low for a couple more hours.

Pour into bowls and serve with diced onions, lime wedges, chopped cilantro, avocado slices and tortillas or tortilla chips.

Serves 8.

------
If you also want to make black-eyed pea and collard greens (I will be), here are some recipes:
Big ol' pot of black-eyed peas
Black-eyed pea dip with garlic and bacon
Good fortune soup
Texas caviar
Peanut-butter collard greens

Follow RecipesDream

Power of Onions

Day - 6 Running on Recipe Marathon.

This post was on my draft for an year. Today iam pulling out from draft for you all. This is an Informative post.

First Iam sharing my Quick Onion Chutney...

Onion Chutney served with Hot Steamed idli's, is certainly a divine combi.

Onion Chutney

Ingredients:

Raw Onions - 2

Dry Red Chilli - 3

Oil - 1 tsp

Method:

Saute the chopped onions and red chilli's in a pan with one tsp of oil for half a minute. let it cool and grind it into a paste by adding 3 tbsp's of water and salt to taste.

if you wish you can season it with mustard, split urad dal and curry leaves.


Serve with Idli's and Dosa's.


Power of Onions:

1. Just crush a peeled small piece of onion, and inhale the smell of its juice, to get rid off your headache's.

2. Onion's are Just Packed with anti-biotic properties. it is proven that, it can help in curing cancer and TB.

3. Onion's work good for heart, as it helps in reducing hyper-tension and cholesterol, thus prevents Blood Pressure also Heart-Attack.

4. Onion's are also said to have anti-septic properties.

6. Onion's can help you to get rid off gastric problem's. (vayuthollai in tamil)


I want to share about this miraculous soup. it just helped to clear my nasal congestion, in minutes. Onion's are best to help you out, when you are affected by cold/flu.

This Onion Soup could prove, you can try it out and tell me..

Onion Soup for removal of Nasal Congestion

Onion Soup

Ingredients:

10-12 Small Onions

1-Big Onion

1 Cup- Water

1tsp-corn flour(optional)

Salt(optional)

Method:

Just peel the outer skin of the small onions and big onions. Big One's can be chopped into four quarter's. In a cup of water, boil these onion's for 5-7 minutes. or you can microwave it for 4 minutes. You can have this with onion's if you like or you can filter the water alone into a glass. you can add salt to taste.

If you want this soup to be little thick, have the cornflour with some water and make it into a thick paste. add this paste to the onion water and let it boil for 2 minutes. if you wish, Garnish the soup with spring onion's.

On having this soup, within minutes, you can sense that you nasal congestion is cleared.

*****************************************************************************


Sauteed Onion's and Garlic for Reducing body heat and Gastric Problem's

A Recipe, that can make your body cool or to say in other words, it reduces your body heat.

Ingredients:

8 cloves of Garlic

10 Small Onion's

Method:

Fry the Garlic and Small Onion's in a tsp of ghee.

Add salt and saute them well.

Mix the sauteed one's with hot rice.

This will certainly help you out in reducing your body heat and gastric problems.


Finally let me tell you a Fact.

Small Onion's have more Protein, Mineral's, Carbohydrate's, Energy, Phosphorus and Iron than Big Onion's.

So Eat Onion's, it will Fight for You.


Check the Highlights of Recipe Marathan
Follow RecipesDream

ROASTED BRUSSEL SPROUTS with BACON

As a child, most of the vegetables my mother prepared were from a can or frozen pouch. "Fancy" at our house was canned cream corn. Being British, she did serve us brussel sprouts, cauliflower and cabbage, but they were always boiled for a long time.

In all fairness, I have to admit that I copied moms method of overcooking vegetables for many years. Recently, I discover roasting fresh vegetables in the oven. The texture difference is excellent and the vegetable flavor is intense. It is such an easy method of cooking, I can't believe it took me so long to try it!!


The measurements in this recipe are totally flexible; it is more of a roasting description than a recipe. If you are preparing more than 2 pounds of brussel sprouts, just increase the amount of bacon and onion a little; the roasting time will remain the same.

2 pounds of fresh brussel sprouts
½ cup chopped onion
6 slices of bacon fried and crumbled
salt and pepper

Wash brussel sprouts and drain well. Cut off the hard stem and peel off the outside layer of leaves. Cut them in half and set aside.

Fry bacon until crisp and remove from pan and drain well. Remove all but 2 tablespoons of bacon grease from the frying pan. Saute the chopped onion in the reserved bacon grease and use the moisture from the onion to deglaze the bacon bits from the bottom of the pan. Cook the onion until it just starts to turn transparent.

Put prepared brussel sprouts and crumbled bacon back into the pan (with the onion) and toss to coat the sprouts evenly with bacon grease, add salt and pepper.

Place everything in a 9x13 baking dish and roast uncovered, at 400F for 25-30 minutes.
Follow RecipesDream

Panda Express Orange Chicken

One of my go-to meals on the craziest of the crazy nights is the orange chicken from the freezer section of Trader Joes.   It takes just 10 minutes to whip together and my kids gobble it up like it's candy.    It was with this in mind when I found this knock-off recipe for Panda Express' Orange Chicken in a church cookbook, that it was one of the first ones I bookmarked to try.  The box of frozen popcorn chicken was a bit of pain to find, so the second time I made it I just used regular cooked and diced boneless skinless chicken breasts instead.   The kids devoured both versions no problem and were asking within the week when I would make it again.   This one's definitely staying on the keeper list!


this version was made with the frozen popcorn chicken as listed in the recipe

Click here for printable recipe. 

The ingredients:

2 packages (12-oz. each) frozen, precooked popcorn chicken (or cooked and diced chicken breasts)
2 Tbs. cornstarch
1 tsp. minced ginger root
1-2 cloves minced garlic
1/4 cup chopped green onions
2 Tbs. rice wine (I omitted this)
3/4 cup water
1-1/2 tsp. sesame oil
3 Tbs. soy sauce
3/4 cup brown sugar
2/3 cup white vinegar
zest and juice of one orange
crushed red pepper, to taste
hot cooked rice

Put desired amount of chicken on baking sheet and cook according to package directions. Meanwhile combine above ingredients in a saucepan. I blended my sauce ingredients together in a blender before heating to make the sauce nice and smooth. Mix and stir until heated through. Toss warm chicken with sauce and serve over warm rice. Makes 6 servings.
 This version was made with the boneless skinless chicken breasts.  I did not think it turned out as pretty as 
with the popcorn chicken, but the kids sure didn't complain about the taste!
Enjoy!

Follow RecipesDream

Mattikaya Vankaya Pullagura ~ Cluster Beans, Brinjal gravy Andhra Special!

I know its been a week since my last post. We have been pretty busy coughing and rocking through the week. The cough and cold started with the boys, then Athamma caught it, followed by hubby dear. Though it isn't so cold these days, it always ends up that December brings in cold and cough without fail. So much so that I didn't realize the week passing and we are almost just two days away from the new year!

I know my best of 2009 is still pending, hopefully I should get inspiration for it within next two days. I am hoping you will all send in yours as well including the my legume love affair!

Though with the cold and cough, we did manage to have a great weekend with family and kids enjoyed the weekend. Which is what matters in the end I think.

Anyway today's recipe is almost 100 years old, if you count that my grandmom learnt it from her mom and passed on to my mom. Who, actually was late in sharing this with me. It's a typical rustic Andhra dish, made with basic ingredients available at home but yet tastes great with plain rice! This was reserved for the cookbook but I thought it makes a great recipe for the blog too!

Photobucket
Our Meal ~ Mattikaya Vankaya Pullagura with Rice, Tomato Rasam and Perugu

Do try this and let me know how you like it!

Before I leave, just wanted to mention about Jennifer's awesome job in getting an interfaith calendar together! I got to know Jennifer through Dosa Mela and was amazed at her interest and knowledge in Indian culture and cuisine.

I just had a look at the calendar and must say it is simple too much of a hard work. Imagine about 100 entries or holidays listed, covering holidays of Muslim, Christian, Hindu (pan--Hindu, Kerala, Tamil and few other select regional South Indian holidays), Jewish, and select Jain and Buddhist with government holidays of both India and America and created a PDF calendar.

Please check out her site and get impressed!

Photobucket


Mattikaya Vankaya Pullagura ~ Cluster Beans, Brinjal gravy

Ingredients Needed:

Cluster Beans/ Mattikaya/ Gawar Beans - 150 gms
Brinjal- 150 gms
Green Chili - 2 chil
Shallot / Small onions - 50 gms
Garlic pods - 3 -4
Tomatoes - 2 medium
Turmeric a pinch
Salt to taste
Tamarind - marble size
Oil - 2 tsp
Fenugreek / Methi
Cumin Seeds
Curry leaves few

Method to prepare:

Trim cluster beans and chop into 1" pieces, brinjals into squares.

Pan cook cluster beans with little water till done, drain the beans from water and keep aside.

Heat a pan with oil, add mustard, fenugreek, cumin, curry leaves and fry for a min.

Then add green chilies, shallot onions, garlic and fry again till onions turn brown.

Once the onions are done, add in the cooked cluster beans and fry for a min. Then add in the brinjal pieces.

Fry for 5 mins, till the brinjal turn colour. Then add chopped tomatoes, salt and turmeric and continue frying till tomatoes are little soft and cooked. Add 1 cup of water, simmer for 5 mins, then add tamarind.

Cook for another 5 mins, remove from stove, mash well using a lentil masher.

Serve with steamed rice.

Notes: After mashing you won't be able to see the cluster beans or the brinjals as whole, but only partial should be visible. This should not be mashed using a food processor, but only with a masher. You can also use the back of a thick ladle if you don't have a lentil masher.

Follow RecipesDream

Szechuan Sauce and Szechuan Chilli Paneer Gravy

Day - 5 on Recipe Marathon..

Soft Paneer on Spicy Sauce. This Szechuan Chilli Paneer Gravy will surely impress Paneer and spice lovers. I prepared this chilli paneer gravy without adding szechuan sauce, but it did'nt taste that good. so this szechuan sauce is a must to prepare this gravy.

I prepared Szechuan Fried Rice, Szechuan Fried Noodles, Szechuan Potatoes and Szechuan Egg Fried Rice with the Szechuan Sauce. I completely enjoyed this sauce's addition in all the dishe's.
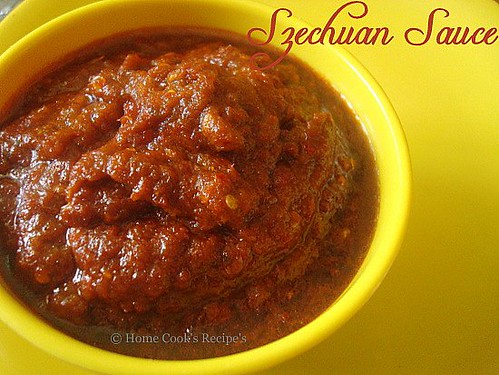
Szechuan Sauce

Recipe For Schezwan Sauce:

{You can make 4-5 servings, with the sauce. }

Oil - 5 Tbsp's

Dry Red Chilli's - 20

Garlic - 10 cloves

Scallions / Spring Onions(White Part)  - 5 [or use one Big White Onion]

Corriander Leaves - fistfull (5 tbsp's)

Corriander Stem's - 10

Vinegar - 3tbsp's

Kashmiri Chilli Powder /  Paprika- 4 tbsp's

*You can add more kashmiri powder, if you prefer spicy and colour in your sauce. ( i added more)


Method:

Soak the Red Chilli's in hot water for about 3 hours.
Drain the Chilli's and Grind it along with other Ingredients. Add little water to get a smooth paste.

Heat a Pan. pour 5 tbsp's of oil. heat the oil. add the grinded sauce to the pan and stir well.
Let the pan sit in medium flame for about 5 minutes.
Let the sauce cool and store it in an air tight container.

I was able to cook 5 servings with the above ingredients. and the sauce stayed fresh for about 3 weeks in my fridge.

Szechuan Chilli Paneer Gravy:


Chilli Paneer Gravy


Ingredients:

Paneer - 100 gms
Red Onion - 1
Green Bell Pepper /Capsi - 1/2
Garlic - 5 (finely sliced)
Green Chilli - 2 (Finely sliced)
Corn Flour - 2tsp's
Spring Onion's (Green Part) - 2 (finely chopped)
Olive Oil - 1 tbsp
aji-na-moto - a pinch

Szechuan Chilli Sauce - 2 tbsp's
Soy Sauce - 1/2 tsp
Vinegar - 1/2 tsp
Chilli Sauce - 1/2 tsp

Method:

Cut the Paneer into small cubes. Roast them in a Tava, till both the sides of paneer turns golden colour.
[The actual Recipe is to dip the paneer cubes in cornflour mix and deep fry them.]

Cut the Red Onion and Capscium in cube shape's.

Mix the corn flour in 5 tbsp's of water without any lumps and keep aside.

Heat a pan, add a tbsp of oil. when it gets heated, add finely chopped Garlic and saute them for half a minute.

Now add the Onion, Capsicum and fry them. also add finely chopped green chilli's and fry it along. Add the roasted Paneer cube's and saute it for a min.

Add all the sauces mentioned and salt to taste. mix well with the paneer, capsi and onion mix.

Now add the corn flour mix and stir well. just let it to boil and switch off the flame.

(If you want it to be in gravy form, add more diluted corn flor mix, or if you want dry chilli paneer, add the corn flour mix and keep stirring, till it gets dried.)

Garnish with Spring Onion's.

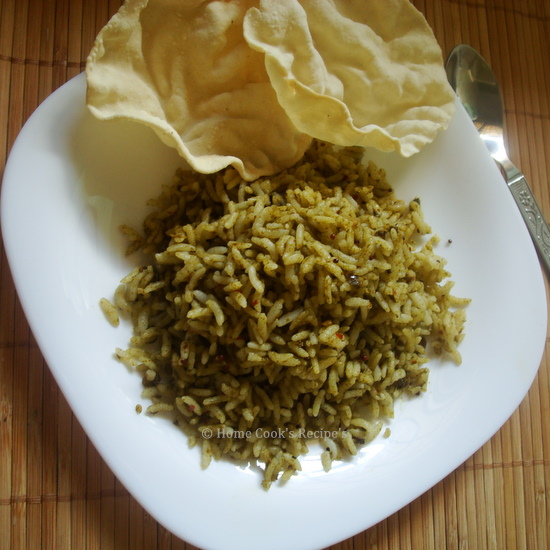
Szechuan Fried Rice:

Szechuan Fried Rice

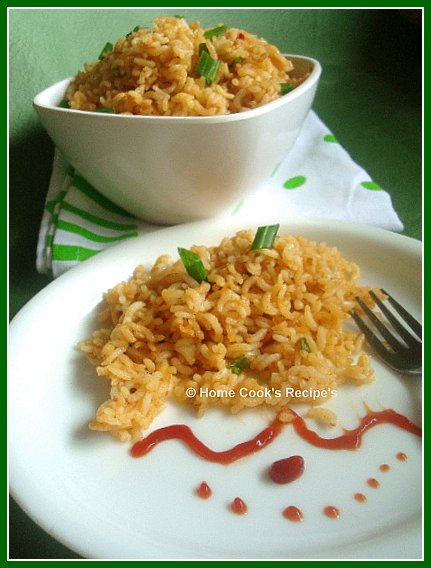
Heat 2 tbsp's of Oil in a Pan, add 2 dry red chilli's and 2 tbsp's of Szechaun Sauce and fry it. Add 1/2 tsp Soy Sauce and mix well. Now add a cup of cooked Rice and mix well. add salt to taste.
add ajinamoto if desired. garnish it with spring onions.
Check the Highlights of Recipe Marathan Day 1, Day 2 , Day 3 & Day 4.

My Fellow Runners on Nupur's Recipe Marathan


Follow RecipesDream

Southern Black Eyed Peas


Southern, Soul Food Black Eyed Peas


Nothing says Happy New Years better than a pot of southern black eyed peas & soul food collard greens! Whether you buy into the hype that eating these dishes will bring wealth & a slew of other good things, just enjoying them with family and being thankful that I've made it into another year is MORE THAN ENOUGH for me!

This is my grandmothers soul food recipe (that I've tweaked a bit). It's a basic recipe for a pot of good ol, southern black eyed peas.  She blesses us with these throughout the year but on New Years they tend to taste a bit better.  Talk about flavorful!!! Forget the bland, mushy black eyed peas you may have tasted in the past. This recipe always gets a "wow, these are some good black eyed peas!" from newbies that have never tasted hers before.  Like always my grandmother just smiles and say "well...it could be better" lol (she's adorable!)

This recipe could easily be turned into vegetarian-friendly black eyed peas by omitting the meat and using vegetable broth instead of chicken broth. You can even get all fancy smancy and throw in some chopped tomatoes, celery and all that other jazz.

Either way they taste fabulous! Pour on some hot sauce and give me a fat piece of cornbread on the side and I'm a happy woman!


Watch me make these black eyed peas from start to finish!


Ingredients

4-5 green onions, chopped (or 1 medium white onion, chopped)
3 cloves of garlic, chopped
1 (16 oz) bag of dry black eyed peas
Smoked Turkey or Ham (as much as you desire. I used half of a fully cooked, smoked turkey leg. Just chopped the meat up into bits. You can leave it whole if you do not like meat in your black eyed peas but like the flavor)
6-8 cups of chicken broth (or enough to cover the beans)
Red pepper flakes, black pepper (optional)


Step 1.) Sort & wash the black eyed peas. Set aside.
Step 2.) Chop onions & garlic.
Step 3.) In a large pot, add in 2 Tablespoons of olive oil and saute the onions and garlic until tender.
Step 3.) Add in the chopped meat, black eye peas, & chicken broth
Step 4.) Cover and bring to a boil. Reduce heat and simmer for 1 hour or  until black eyed peas are tender.
Step 5.) Remove from heat and let sit covered for about 10-15 minutes.
Step 6.) Season with red pepper & black pepper if desired.

Enjoy!!!
Follow RecipesDream

Paruppu Thuvayal

If i had to cook in less than 30 mins, then this Thuvayal and Rasam finds its place definitely. This is my hubby's favourite too. I got the Recipe from Kribha. I have tried few recipe's from her blog and loved it a lot. Thanks Kribha for sharing the recipe.

Paruppu Thuvayal

This Paruppu Thuvayal is served for Nursing mom's. The Garlic and Tuvar Dal helps in Milk Secreation.

Ingredients:

Tuvar Dal / Tuvaram Paruppu - 1 cup
Milagu / Pepper - 5
Dry Red Chilli - 3
Grated Coconut - 3 tbsp's
Garlic - 2
Curry Leaf - 5
Asafoetida powder - 1/2 tsp


Method:

In a Kadaai / Thick Bottomed Pan, Dry Roast the above ingredients one by one.

Add 4 tbsp's of water & Salt to taste, along with the dry roasted ingredients and Grind them into a coarse paste.

Mix the Thuvayal with Hot Rice, Add Ghee and mix. My way is to pour Rasam generously over the thuvayal and i love to munch some pappad with it.

Kothamalli Sadham / Corriander Leaves Rice:

I got to share my Kothamalli Rice Recipe with You all. I prepared my Kothamalli Thokku and mixed with Rice. It turned out excellent. Kothamalli Thokku is one, to be eaten with Hot Idli's or Dosa's. It is also eaten with Noi Kanji, when fallen ill. The Kanji with this thokku is a great combination. anyway for packing lunch, you can mix this thokku with Rice, add some roasted peanuts and pack for lunch.

Check My Kothamalli Thokku Recipe here.

Kothamalli Sadham
[Today's Lunch]

Check the Highlights of Recipe Marathan Day 1, Day 2 and Day 3.

My Fellow Runners on Nupur's Recipe Marathan


Follow RecipesDream

Cheesy Baked Ravioli


I was never a fan of ravioli as a child, especially that canned crap. As an adult I absolutely love the stuff especially if it's homemade but frozen suits me just fine! This baked ravioli recipe has to be one of my toddlers favorite meals. I like it because it's quick and easy. Something I can throw together and still have it come out tasting like a time-consuming, homemade meal. Not to mention it soothes my beastly craving for homemade lasagna. (which is exactly what it tastes like to me)

One thing I love about baked ravioli (besides it being so cute & fun to eat) is that it is so versatile. Sometimes I add in a layer of spinach & spicy sausage to give it a lil pizzaz.  I've even used the chicken stuffed ravioli with success.

This baked ravioli would be a great dish to make for last minute company or to take to a potluck. You could even get the veggie stuffed ravioli & make it a completely vegetarian recipe. It also freezes like a champ! Uh! Gotta love it! If only men could be this accommodating.... ;  )

Ingredients

1 small onion
2 cloves of garlic
1 lb ground beef or ground turkey
2  (24oz each) jars of spaghetti sauce ( I used a jar of Bertolli five cheese & a jar of Bertolli Tomato Basil flavor)
1 1/2 bags of cheese (8oz bags each)  (I used 1/2 bag of mozzarella & a bag of Sargentos Italian Blend cheese)
1 (1 lb) bag of frozen cheese ravioli


Step 1.) Dice up onion & garlic.


Step 2.) Saute onion & garlic in 1-2 Tablespoons of olive oil on medium heat until tender.


Step 3.) Add in ground beef & cook until done. Drain the excess oil from the pan.


Step 4.) Add in the spaghetti sauces. Stir until combined.


Step 5.) Spread a thin layer of sauce on the bottom of a 9 X 13 inch baking pan. 


Step 6.) Add a layer of the frozen ravioli, a layer of the sauce mixture and then a layer of cheese. Repeat this step one more time.


Step 7.) Place into the oven and cook for 35 -40 minutes.


Throw together a big bowl of salad and a basket of french bread and dinner is a wrap!


Enjoy!


Follow RecipesDream

Canned Tomatoes

Canned tomatoes are a staple in our home. We use them to make tomato sauce with meat and pasta. I drain them (drink the juice) and toss them into salads in the winter. We eat them on hamburgers and as a side dish right out of the jar. Compared to the "fresh" tomatoes which are available in the market, there is no comparison for flavor.

The only tomatoes we can (as long as we have a choice) are San Marzanos. They are a roma tomato and are very meaty with less water than other varieties. They hold up well, are not very acidic, and taste great!

To can tomatoes whole, I do the following:

1. Wash the tomatoes in the sink. Cut off really bad spots (black spots) and smell the tomato to make sure it's OK. A lot of times if there's a big black spot in the tomato, the whole thing should be tossed out. Feed the scraps to the chickens or pig, or compost them.
2. Prepare 7 quart-sized jars for canning (wash) and fill each with 1/2 t. salt.
2. Drop 10 - 20 tomatoes into boiling water. As soon as you see the skin on one tomato crack, remove them all. I place them immediately into cold water.
3. Remove the skins. Put the whole tomato into the jar. It takes about 14 tomatoes to fill a jar.
4. Fill the jar until it's about 1/4" from the top. Take a knife and run it along the outer edge (down to the bottom) of the jar to release any trapped air in the jar.
5. Wipe the rim. Place a seal on and the ring.
6. When you have enough jars filled to fill your canner, place in either a hot water canner or a pressure cooker and process according to their instructions.

Important: Make sure you replace at least half of the water in the canner with cold water before you do a second batch or you might crack a jar. Also, do not open the lid on a pressure cooker until the pressure is down to 0 or do not open up the steam vent to let the pressure go down more quickly - the liquid in the jars will evacuate and you'll be left with a 1/2 full jar.

Remove the jars from the pot, let cool, rinse the next day and remove the rings (only after about 24 hours) and store in a dark, cool place. I store ours in a pantry and it's not super-cool or super-dark but it works.

Enjoy!
Follow RecipesDream

Apricot and Mulled Wine Fruit Soup


Hope you've all had a lovely Christmas with lots of delicious food! We celebrated the Christmas Eve (the main event in Estonia) with a large traditional meal at our home, and we've also had several other festive dinners over the last week. I'm now ready for some non-Christmassy food, though there are still some festive recipes I'll post over the next week. First up is a simple fruit soup (kissel) that I made last Christmas. You'll need a carton of light non-alcoholic glögg for this - I'm pretty sure your local Scandinavian store or IKEA food isle serves something suitable.

Apricot and Mulled Wine Fruit Soup
(Jõulune aprikoosikissell vahukoorega)
Source: Finnish Valio
Serves 6

1 litre of light (non-alcoholic) glögg or mulled wine
250 g dried apricots
3-4 Tbsp sugar
2 Tbsp potato starch or cornflour

Heat glögg and apricots in a saucepan. Simmer on low heat, covered, for about 30 minutes, until apricots are softened. Blend with an immersion blender until smooth.
Mix potato starch or cornflour with couple of spoonfuls of cold water, stir into the fruit soup. Bring just to the boil (when using potato starch) or cook for a few minutes (when using cornflour), stirring.
Remove from the heat, divide between dessert glasses and let cool.
Serve with some softly whipped cream.
Follow RecipesDream

Hummus Recipe - How to Make Hummus


Learn how to make the best hummus dipping dish. Easy and delicious recipe for middle eastern hummus. This recipe consists of chickpeas, tahini paste, olive oil, lemon juice, garlic, paprika and parsley. This flavorful chickpea (garbanzo bean) and sesame party dip recipe is a nice departure from cream cheese and sour cream based recipes. It's yummy...Enjoy!

Hummus is the Arab word for chickpea, more commonly known in the United States by its Spanish name, ‘garbanzo’ bean. But ‘Hummus’ has become synonymous with the dip, not just the one ingredient.

Ingredients
2 cups canned chickpeas (garbanzo beans), liquid reserved
2/3 cup tahini paste*
5 tablespoons olive oil , divided
1/4 cup lemon juice
3 cloves garlic
Salt and pepper to taste
1 teaspoon paprika
1 tablespoon fresh parsley, chopped (optional)

Preparation
  1. *You can make your own tahini paste in a food processor or blender by grinding toasted sesame seeds. Toast the sesame seeds over medium heat until golden brown, about 3 minutes.
  2. In a food processor, puree the chickpeas, tahini, 3 tablespoons olive oil, lemon juice and garlic until smooth, adding a little of the reserved liquid if the mixture seems too thick; it will be slightly grainy. Season with salt and pepper.
  3. Transfer to a shallow bowl or plate.
  4. Combine the paprika and the remaining 2 tablespoons olive oil, drizzle the mixture over the top, and garnish with chopped parsley, if desired.
  5. Serve with pita bread triangles. Makes about 3 cups.
Save and share Hummus Recipe
Want to share this recipe with your family and friends? Click the button below to send them an email or save this to your favorite social network.
Follow RecipesDream