Loading
Showing posts with label North Indian Dishes. Show all posts

Aloo Paneer Kofta Curry Recipe ~ Weekend Cooking!

Last weekend when I made the Tomato Pulao in microwave, I was thinking what should be done as the side dish for the pulao. Hubby dear doesn't like just Onion raitha being served along with the pulaos as they hardly ever spicy. So a spicy gravy is what he expects most times. Normally with the ground masala that we make for the tomato pulao, we make cauliflower curry. But this time thought should make something different.

Amma had made this Koftas with Aloo and Paneer. The curry made a great pair with the tomato pulao. I was sure it would have been ever more delicious if you were to serve this with Naans or even plain rotis. Try this for this weekend, I am sure you will love it!

Saturday is going to be an off and I already have fully packed plans. With the Blogging Marathon getting into its final few days, I still have one more dish to make for the final day. I am sure I will finalise by tomorrow.

Now let's get to the recipe!

Aloo Paneer Kofta Curry

For the Koftas
 
Paneer  1/2 cup
Aloo - 2 medium
Maida - 2 tbsp
Green Chilies - 1
Red Chili powder - 1/2 tsp
Salt to taste
Oil for deep frying

For the gravy

Onion paste - 1/2 cup
Ginger Garlic paste - 1 tsp
Tomato puree - 1 cup
Chili powder - 1 tsp
Garam masala - 1 tsp
Cumin powder - 1/2 tsp
Curds - 25 gms / 1.4 cup
Cashewnut paste - 10 nos
Salt to taste
Oil - 2 tsp


How to make the Koftas

When you make the paneer, it's better if you don't try to make a cube out of it. Just store it as such, since you will anyway need to crumble it for the koftas.

Take everything in a bowl, mix well. The maida and aloo should hold the mix well. Shape them into balls and deep fry, Keep it aside.

How to make the Gravy:

Heat a non stick pan with oil. Add the onion paste, saute well. Then add the ginger garlic paste. Keep stirring till the mix is well cooked.

Then add the tomato puree, and chili powder, cumin powder, turmeric powder, garam masala and salt. Simmer till the tomato is well cooked. Simmer and add beaten curds. Make sure to quickly mix everything.

Finally when the tomato sauce is well cooked, takes about 10 mins, add the cashew nut paste.

Simmer for couple of mins.

Finally add chopped coriander.

How to serve the Aloo Paneer Kofta Curry.

Place the fried koftas in a bowl, pour hot sauce over it and serve right away.
Notes: If you are not planning to eat the dish right away, it makes sense not to add the koftas as it will absorb all the sauces. Just before serving, heat the sauce again, if required, pour over the koftas to serve with Rice or roti.

Have a great weekend!
Follow RecipesDream

Bhindi Masala Recipe | How To Make Bhindi Masala with Step by Step Pictures | Lunch Box Series : LBS#64

If you have been around, reading this blog for a while, then you must know that there are couple of dishes that have eluded me. One is the Bhindi Masala and the other, Moong Dal Halwa. Though I have made and got hubby dear's nod on Bhindi Masala's taste, it still seems isn't the right one. Bhindi Masala, of course got attested as the recipe. But looks like I was mistaken. Though it tasted great and all, it didn't look like how it is served in Delhi.

Now if you have ever been in a situation fighting memories, get it from me, you will fail miserably. Just as I have. It's like hearing statements like no one can prepare that chutney like my mom or like that kerala curry just like my uncle. Well the list is endless. Even Daddy comes out with such statements and you know Amma cooks like a dream. I just tell them that it must have been the first time they were eating it and the memory just stayed. I know it's easy to defend this way, than trying to get that perfect recipe okay.


Anyway I was happy having found one recipe that was right, until I was shown how Bhendi Masala looks like. We were watching the movie 3 Idiots, guess what happens? I suddenly hear a squall! Startled I turn to look at hubby dear who has that look on his face, I asked him what happened. He says that's how Bhendi Masala looks. I was thankful that it's a DVD that I could play back couple of times to see how the dish looks. Raju Rastogi's mom feeds him Bhindi Masala with rotis when he is in hospital. If you have seen the movie, then you can imagine how funny the situation must have been. We missed watching that movie in the cinema, and we really enjoyed the first time we watched it. Of course this movie joined the exulted line of movies that get run for some 1k times at home. And I didn't actually have to play again for myself as kids were watching it anyways.

Coming back to how Bindi Masala looked, I must say it looked very pretty. The Bhindi were still very green, and pretty with all masala mixed. I was wondering how one can cook something completely without loosing it's colour. Unless it was only half cooked. Well I will only know if I get hold of that cook who made, which again is not a possible thing. 
I am sure by now you are now curious to know how I got this recipe. Well this recipe comes from my colleague's mom. He is from Delhi and you can imagine how much of a foodie he is. So when we are not discussing work, food becomes the main topic. I asked him to get the recipe from his mom. I was surprised to see that just adding one more ingredient, how the dish got changed completely! He says there will not be a dish without amchoor not being added and the store bought ones can't stand a chance with his homemade amchur powder. Well that might be very true, still I got to make do with the store bought amchur powder right!

So armed with the recipe, I planned to make a complete punjabi meal for office lunch. So made Lasoon Masoor ki dal, Jeera Pulao and Bhindi Masala. When I told hubby dear that he can expect Bhindi Masala, pat came the reply if the rotis are made. Well there I was planning a typical dal chawal subzi, and he asks for roti!

Finally whatever it was, it was one delicious meal and it was approved by everybody including my colleague who said it was how they make it at home. So finally here comes the dish..

Step by Step Pictures

 Mix all the spice powders along with oil.
 Wash, wipe and dry the Bhindis
Cut into pieces as shown above!
Slit open through the middle.
Stuff with the spice masala.

 Cook in a non stick pan for best results.
It's ready!

Bhindi Masala | Curried Okra with spices | Lady's Finger sauteed with spices

Ingredients Needed:

Bhindi / Okra / Lady's Finger - 250 gms

For the spice mix

Red Chili powder - 1 tsp
Coriander powder - 1 tsp
Turmeric a pinch
Salt to taste
Amchur / Dry Mango powder - 1/2 tsp
Anardana / Pomegranate seeds powder - 3/4 tsp
Cumin powder / Jeera powder - 1/2 tsp
Oil - 1 tsp

Method to prepare:

Clean and wipe the Bhindi dry. Trim the crown and tips. Chop them into long pieces and make a deep slit in the middle. Keep aside. I was told these are normally tied with threads to have the masala intact.
In bowl, take all the masalas and mix well with oil. Stuff this masala into the Bhendi pieces. After a point I was really tired of stuffing into the small pieces, so if you stuffed most of them, you can sprinkle the rest on the top or roughly mix the bhindi with the masalas.

Heat a non pan or kadai with oil. Add the stuffed Bhindi and add another tsp of oil if required. Cover with lid and simmer for 5 mins or till the bindi is cooked. 
It takes about 10 mins or so to get done.
Serve with rotis or jeera rice and dal.

Notes:
Best to select tender Bhindis as they will get cooked faster.

If you have the Anardana seeds, then slightly dry roast and make a fine powder. Fine powder may not be possible. But not real coarse. Store in air tight container. What I have has been there for a while..:)

Follow RecipesDream

Hara Gobi | Dry Cauliflower in Mint Sauce

If there ever was a recipe that stayed the longest in my draft, then that honour should surely go to this recipe. Hara Gobi recipe was something that came into our life a long time ago, yet it never made it to the blog as one might expect. If you are a person who loves pungent spicy stuff, then this is a recipe for you. I am really not a person who loves strong pungent flavours in any dish. But if you allow it, this recipe will surely grow on you. It is something that you got to get used too, that is, if you don't like the strong mint flavour like me.

It happened one fine evening when I visited my parents during their dinner time. As soon as they saw me, they offered this dish to eat. It was green and I didn't even look further than that and took a bite. With a reaction that said "Ahgguu what's that!", I gave it back again. Dad was surprised and said how I could react like that on a dish that they loved so much. It took me a moment to get that sink and I realized I offended them. It was a spontaneous reaction because of the strong mint flavour. I know I could have controlled my reaction. So to mend things I took another bite to taste and realized it was good, only you got to see the dish and understand that it's made with mint and gobi. Anyway I asked Amma for the recipe and made myself acquainted well with it.

Furthermore Daddy asked how I could react like that being a food blogger. Well I said being a food blogger doesn't mean I can taste and appreciate everything at the first shot. But of course I can learn to appreciate some dishes finally. After all who can say no to a minty Cauliflower! This Hara Gobi is a pungent dry dish that takes you completely by surprise. But then if you are fond of mint and gobi, this must surely be something you can easily lap up.


Hara Gobi - Dry Cauliflower in Mint Sauce

Ingredients Needed:

Cauliflower - 1 small head
Mint paste - from 1 big bunch
Ginger Garlic paste - 1 tsp
Onion - 1 finely medium,
Green Chilies - 2 long
Salt to taste
Pepper powder - 3/4 tsp
Oil - 2 tsp

Method to prepare

Wash and clean the cauliflower. Cut into florets and take a bowl with water covering it completely. Bring to a boil and keep it aside with lid covered.

Wash and trim the mint leaves. Make a fine paste in a blender/ mixer using water.

Heat a non stick pan with oil, saute onions till brown. Then add finely chopped green chillies. Fry for a minute. Then add ginger garlic paste, a minute later add the mint paste. Keep stirring to make sure it doesn't get burnt. Simmer for couple minutes till the mint paste is cooked well.

Then add salt and pepper. Finally add the drained cauliflowers florets to the pan. Stir well to get the florets well coated. Continue cooking till it's dry.

Takes about 5 -7 mins in high. You can do in simmer too if you are using a regular pan.

If you are fond of cauliflower, then you must try these Cauliflower Recipes

Or if you like Dry Curries check them out!

Have a great weekend.
Follow RecipesDream

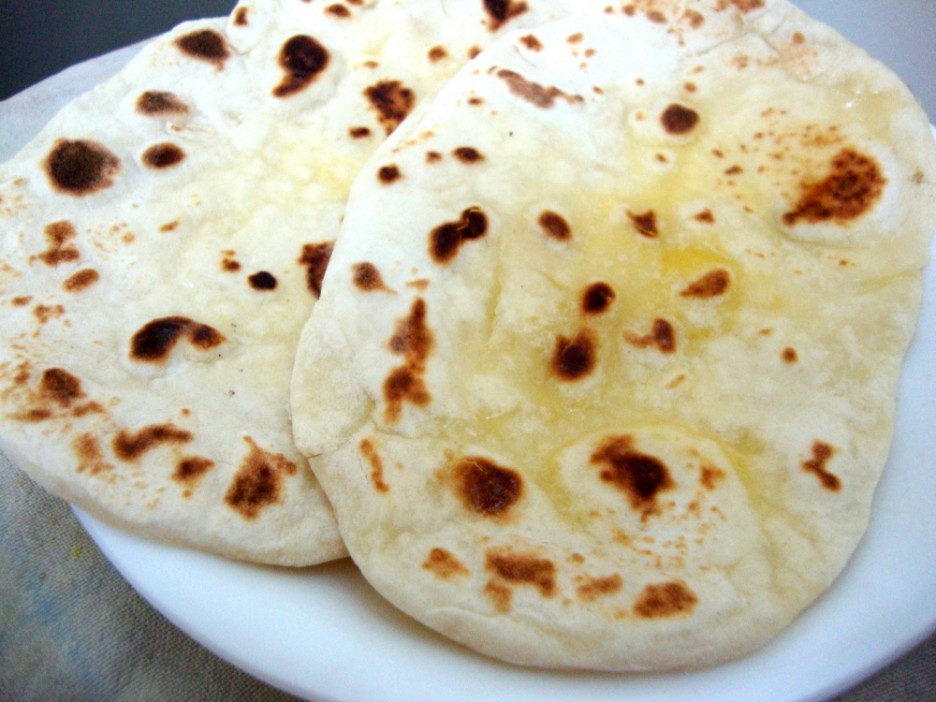
Tawa Naan Recipe | Making Naan on Tawa - Step by Step Recipe

When I baked a Naan sometime back, I realized that I actually make the Naans couple of ways. So thought that recording all the different ways to make a naan will be interesting. If you have been reading this blog you may know that I am great fan of Naan and Paneer Butter Masala. This is what I order each time I eat at a restaurant. I don't think I can ever get bored of the duo or the different versions I can count that I have enjoyed by now.

I think I started making Nan at home almost ever since I started baking Pizzas. Since we don't have a tandoori oven, it was naturally that I had to find an alternate method. I have been making on the Pressure cooker bottom or even the tilted tawa method for over a decade now. And what's surprising is the fact that the Naan dough is almost the same as Pizza dough or at least that's how I have been making it. Wonder how the best dishes I like are almost the same. 


Anyway I used to enjoy the feedback my Naans used to get and one particular conversation comes to mind. It was during dining in our club restaurant when the waiter happen to mention that their Naans come out best and nobody can replicate it at home. Konda immediate response was that I make yummier Naans and Paneer Butter Masala. He was not ready to accept and said Naan would require egg to be added for the soft texture to come etc, knowing well that I don't eat egg. Anyway I said I didn't want to argue on whose recipe is best. I would rather enjoy their restaurant Naans myself.

When I think of the recipe, I keep changing the ingredients myself most times. I have used curds, butter, milk at varying proportions to get the best texture. Each it does turn out very well. So I guess it depends on how and when you make it.

3 Ways of Making Naan at Home
Baked Naans
Stove top Naans Recipe 1
Stove top Naans Recipe 2

And this is the third method!
For step by step pictures of kneading the dough, please refer Baked Naans

Once you ready with the naan dough, pinch out small balls. Dust well and roll out as oval shaped disc
Heat a tawa or griddle. Place the rolled out naan / griddle/ skillet
Cook on one side, you will see the naan puffing up.
See how nicely it has puffed up!
Flip to the other side and continue cooking.
Turn over again and remove.

Smear butter right away on the hot Naan.

Tawa Naan | Making Naan on Tawa

Preparation Time : 15 mins
Resting Time : 1 -2 hrs
Cooking time : 2 -3 mins per Naan

Ingredients Needed:

All purpose flour / Maida - 2 cups
Dry Yeast - 1/2 tsp
Sugar - 1 tsp
Curds - 1 tbsp
Butter - 1 tbsp
Salt to taste
Water as required.

Method to prepare:

Proofing the Yeast:
Take the yeast in a cup; add the sugar and warm water. Cover with lid. After 10 minutes you will see all frothy texture on the top, don’t disturb. Keep it aside. This shows that yeast is still active.

In a wide bowl, take the flour, add the yeast mix. Then add the salt. butter and curds. Crumble well.  Slowly knead to soft pliable dough using water as required. Punch it well for couple of minutes.

Cover with a wet muslin cloth and keep it in a warm place for 1 -2 hrs. Once done, remove the cover, punch it down again. For making on tawa you need not wait for 2 hrs, the dough gets ready by 30 - 40 mins max.

When you are ready to make,  get the tawa on stove.

Divide the dough into small balls, dust it in flour. Roll them into oval shapes.

Make couple of them all rolled out by the time the tawa gets heated up.

Place the rolled out Naan on the tawa. Cook on high flame. You will see the Naan puffing up. Gently flip to the other side. The Naan puffs up on both sides.

Remove and quickly apply butter over the top.


Note: It is enough to cook on the tawa for the naan to be done well. If you want those classic black spots on the top, you can put the cooked naans on direct flame using a tong. This way your naan will have those traditional brown/black spots on top.

Serve this with Paneer Butter Masala or even Low Cal Paneer Butter Masala in Microwave

Follow RecipesDream

How to make Kadai Paneer Step by Step Recipe

Kadhai Paneer is one of those other frequent dishes that Amma used to make often apart from Paneer Butter Masala. She used to mostly add capsicum and make it really sauteed to keep up to its name. When I read on net to see why and how it got its name, it wasn't clear but it kind of referred that it's a dry kadai recipe where the masala clings to the paneer cubes. Though Amma makes it differently, I wanted to try a new one.

Googling this took me to Sanjeev Kapoor's and then Tarla Dalal. I decided that I would mix both and arrive at my own dish that will suit us. So finally this adaption worked out well. As such there may not be an authentic origin for this dish but guess when you love how this tastes with rotis you really will not bother about it.
Step by Step pictures to make Kadai Paneer


Kadai Paneer | Cottage cheese cooked in spicy kadai masala

Preparation Time - 10 mins
Cooking Time : 12-15 mins

Ingredients Needed

Paneer / Indian Cottage cheese - 300 grams
Oil - 1 tsp
Butter - 1 tsp
Whole dry red chillies - 2
Coriander seeds - 2 tablespoons
Cloves - 2
Cinnamon one inch sticks - 2
Bay leaves - 2
Onion , finely chopped - 2 medium
Ginger Garlic paste - 1/2
Red chilli powder - 2 teaspoons
Tomatoes, puree - 2 medium
Salt to taste
Green chilies - 2 long
Fresh coriander leaves, chopped - 2 tablespoons

Method to prepare:

Coarsely pulse the red chilies and coriander seeds, it should not become a fine powder.

I used homemade Paneer. Cube into 2 inch pieces.

Heat butter in Kadai, roast the paneer cubes until it turns golden in colour. Remove and keep it aside.

In the same kadai, heat oil, red chillies-coriander coarse powder, cloves, cinnamon, bay leaves sauté for two minutes.

Then add the onions, silted green chilies stir. When it starts turning colour add ginger garlic paste, red chilli powder and mix well.

Continue to sauté for two minutes, add tomato puree, salt. Cover with lid and let the puree cook.

When the tomato puree is well cooked, add the roasted paneer, mix well. Finally add the coriander leaves and serve with rotis.


Follow RecipesDream

Sweet Potato Paratha | Sweet Potato Indian Flatbread

I love Sweet potatoes! And always loved eating it as such. There are always certain things that you just eat as such and never can imagine it being incorporated in a dish right. Sweet Potatoes are such things for me. Shakarkand as it is called in Hindi, we call it Genusa gadda in Telugu. 

This month when Harini announced her Design a Menu Event, I checked in to see what ingredients she listed. When I saw Sweet Potato as one of the mandatory ingredient, I knew I ought to make these parathas. The first time I remember reading this paratha being made with Sweet Potato, was when I started blogging. Since then I have seen sweet pototo being used in different ways. But paratha is the best way to use it. 

I remember Richa posting this and checked to see how she made it. Though I don't normally add hing to my parathas, I saw it was used and wanted to experiment with it. It gave a nice taste and since I can never make without adding jeera powder, I added that too to the dough.

I always make parathas two ways, one stuffed way and the other blended with the flour. When you blend the stuffing mix to the flour you can end up making the parathas much quicker than the regular stuffed way.
We had these for our breakfast this morning with just Curds and Avakkai and can tell you that it was simply too good.


Sweet Potato Paratha

Sweet potatoes, boiled - 1 big
Wheat flour - 2 cups
Turmeric powder a pinch
Red Chili powder - 3/4 tsp
Roasted Cumin powder - 1/2 tsp
Asafoetida / Hing a pinch
Salt to taste
Coriander Leaves - 1 tbsp
Curds / Yogurt - 2 tsp
Water to knead the dough
Oil to cook the paratha

Method to prepare:

Pressure Cook the sweet potatoes and peel once it cools down.

In a bowl, take the wheat flour, spices, salt, curds, coriander leaves and mashed sweet potatoes. Mix well to incorporate the spices in to the flour.

Add water as required to knead into a soft and smooth dough. Keep aside for 10 mins.

Heat a griddle/tava. Roll into medium sized parathas and cook like a regular paratha, spreading a few drops of oil on both the sides while cooking them.

Serve with Curds and pickle of your choice.

These parathas tend to be very soft because of the potatoes and make a great start to the day.


Sending this to Harini for her Design a Menu Event.

I might make Masala Vada , Mamidikaya Annam ~ Mango Rice,
Menthakku Pappu , Godumai Halwa ~ Wheat Halwa, Chocolate dipped Strawberry.
This is also going for my Breakfast Mela, which is going on until May 20th.

Follow RecipesDream

How to make Dal Fry Restaurant style | Step by Step Recipe | Lunch Box Series : LBS#60

When we eat out, it is normally the North Indian food that gets ordered. Naturally the vegetarian gravy is always Paneer Butter Masala no doubt. When there are more vegetarians dining along with me, the other dish that gets the next place will always be the Dal Fry. Dhal Fry complements the spicy paneer Butter Masala and makes a great combo with the vegetarian fried rice too. It's always very mild but is rightly done in all quarters.

I always wondered why it is called fry, because it is a liquid dish. We tag a fry to be a dry dish. I guess this gets it's name from the fact that the restaurant chefs have all the things pre-cooked for this dal and just fries it before serving. Of course same goes for all other things, except this dish is more of a sauteing than anything else.

Anyway when the Paneer Butter Masala is as good as the one we order out in restaurant, I wanted to try out this Dal fry. I believe the unique taste here is because of the Masoor dal. I was browsing through my recipe collection and came across this recipe that I must have got from my GDM group and wanted to try it right away. It has the same taste you get in the restaurant and I made it for our Lunch box, paired with Jeera Rice.
 
This is a simple dal that can be served with rice/rotis. Especially with fried rice and Naans.


Step by Step Picture Recipe

Take both Masoor dal and Moong dal in a pressure cooker.
Add green chilies, garlic and ginger to be pressure cooked together.
The dal is almost mashed, so you don't have to mash it any further.

In a non stick pan, add ghee, saute onions, red chilies
Then add onions, saute till it turns brown.
 Next goes the tomatoes, add salt for it to turn soft.
 Add the cooked dals.
Mix well and add water as required.


Bring to boil.


Dal Fry ~ Restaurant Style
Cooking Time from start to finish: 30 mins.
Serves 4.

Ingredients Needed:
Masoor dal / Red Lentil - 3/4 cup
Yellow Moong dal / Split Green gram - 1/4 cup
Green chillies - 2-3
Grated Ginger - 1 tsp
Garlic, crushed - 1 tsp
Turmeric powder a pinch
Salt to taste
Cumin seeds - 1/2 tsp
Dry Red chillies - 1-2
Onion  - 1 medium
Tomato - 1 medium
Ghee - 2 tbsp
Chopped Coriander leaves - 3 tbsp
Butter or Cream for topping - 1 tbsp (opt)

Method to prepare:

Wash the dals and pressure cook with water along with ginger, garlic, turmeric, salt and broken green chillies. The dal should be well done and not too watery. If you want you can mash the dal a bit with the back of the ladel

Heat the ghee in a non stick pan, add the cumin seeds and red chilli. Then addd onions and fry till light brown.

Next add the finely chopped tomato and fry for 2 mins. Once this is done add the dals and simmer on medium heat for 5 mins

Finally garnish with coriander and top with cream/butter (optional)

Serve hot with rotis/parathas


Notes

If you are serving with Naans the dal can be little thicker
Please remember that the dal thickens a bit as it cools or loses temperature
If you want to avoid ghee you can use regular cooking oil. But the restaurant effect comes out more by the addition of ghee.


Other North Indian Recipes

Lunch Box Recipes
Simple Dals

Make this for your Sunday lunch and enjoy!
Follow RecipesDream

Rajma Masala Recipe | Lunch Box Series : LBS#59 | Step by Step Recipe

I really didn't want to say this but the days are really running. What with me doing a Marathon run along with some 25 bloggers, I almost seem to forget that I need to do some posting here too. Only the other day I was telling Athamma that I have about 45 recipes in drafts and I have also forgotten some of the recipes. I know that's very stupid of me, but I always think I will remember the recipe when I make it and in the end almost sometimes forget what went in.

Now there are two ways to handle this, either I cook that dish many times for me not to forget or write them down right away. And there are those recipes that either Athamma or Amma share with me. I will make it and prepare the dish, click the pictures and forget the recipe right away, hoping they will remember. Well looks like even they forget what with the many recipes that we try in a week's time. 
I know I am blogging back my Lunch Box Series after a long time. I feel sad that I no longer take the opportunity to share my lunch box. But with hubby dear packing his box again, here you go! But do excuse the shabby final picture I was naturally in a hurry!


So this recipe that I attempted from my files came out so well. I always remember the Rajma Masala that my friend's mom used to make and was never able to recreate at home. But this one came somewhat closest. Best part was my kids enjoyed this very much.

Step by Step pictures to make Rajma Masala

Have the masala, onion paste, tomato paste ready.
In a non stick pan, saute broken coriander seeds and cumin seeds.
Then saute onion paste, followed by ginger garlic paste.
Next goes the tomato paste.
Meanwhile mix the spice powders with water.
Soak the Rajma overnight but depending on your lentil it has be increased.
Pressure cook well and mash a spoon of lentils to thicken the gravy.
Add that to the pan
Continue cooking in sim till you see the mix well cooked.

Then add required amount of water and bring to boil. Then simmer for 10 mins for the gravy to thicken.
Rajma Masala Recipe

Ingredients Needed:

For cooking Rajma

Rajma - 1 cup
Red chili - 1/2 tsp
Salt - 1/2 tsp

For Masala:

Broken Coriander Seeds - 1/4 tsp
Cumin Seeds - 1/4 tsp
Onion paste - 2 medium
Ginger Garlic paste - 1/2 tsp
Tomato paste - 2 medium
Red chili powder - 1/2 tsp
Coriander powder - 1/2 tsp
Roasted Cumin powder - 1/4 tsp
Amchur powder - 3 pinches
Kitchen King Masala - 1/4 tsp
Garam Masala - 1/4 tsp
Turmeric powder a pinch
Salt to taste (remember to check and adjust)
Oil - 2 tsp
Coriander leaves, finely chopped - 2 tsp
Methi leaves (opt)

Method to prepare:

Soak Rajma over night. More if the variety you use takes longer time.

Drain away the water and pressure cook the Rajma with salt, 2 drops oil and Chili powder. Cook till it is tender. Keep it aside.

For the masala:

Make a paste of onions, get tomato puree separately. Keep it aside.

In a non stick pan, heat oil add cumin seeds, broken coriander seeds.

Once the cumin starts spluttering, add onion paste, then ginger garlic paste. Brown it well.

When onion paste has turned brown add finely chopped tomato. I normally add salt at this stage and cook it covered to aid the tomatoes to cook faster.

Saute till tomatoes are cooked and the oil starts coming out of the sides.

In a small cup take all the spice masalas - garam masala, turmeric, chili powder, kitchen king masala, amchur, coriander powder, cumin powder, add little water and make a paste.

Then add this paste to the tomato mixture. Continue cooking.

Add a ladle of cooked rajma and mash into the gravy. Cook for couple of minutes and then pour the remaining Rajma along with the water to this masala.

Keep it on simmer for at least half an hour, stirring from time to time. Top with chopped dhaniya and Dried Fenugreek leaves..

Serve with Plain Rice or Chapatis.


Notes:
The Rajma I used took long time to get cooked. In fact we soaked it the previous afternoon. Kept changing the water.

Never use the water in which the lentil is soaked.

Since you are adding the cooked rajma to the gravy to make it thick, ensure it is cooked well.

The masala list seem more but it is worth all the trouble. Moreover all these masalas can be kept in freezer for longer shelf life.

I was very surprised how much the kids liked it. They had it with rice and wanted it again for dinner. While I had made Chapatis for our lunch. This went very well with both.
Follow RecipesDream